You should have a sky and an ocean depending on the subject matter you pick. It determines your colors and what you are going to paint. I don't know if you are doing sunsets, silhouettes, daytime, or sunrises. Silhouettes are good for sunsets. silhouettes of palm trees, people, boats, etc. but lets assume you did a daytime ocean and sky and you are going to paint a flying marlin. The subject matter will differ, your choice of fish, in this case we are using a marlin. Find a picture of a marlin in a magazine of any sort, it could be completely out of the water or half out of the water.
Imagine your marlin picture in a silhouette. In your mind place that silhouette on the ocean or halfway near the center of the canvas. In seeing the outline of the marlin, you can see how large you want it. You will begin with a white silhouette of your fish. Let it dry. Once you have the white silhouette of your fish, you can easily blend colors on a palette or paint solid colors on the white silhouette. Use a spatula or brush to blend them. Just doing the basic color structure of the fish. Detail work on the fish is last. Once you have the blended colors that completely fill the white silhouette, and it's completely dry. You can now start detailing the fish. Usually start at the gill fins and the anal fins and the fins on the bottom of the fish. Then find out where the eye is placed. Pay attention to the detail. On doing the fish's eye, start out with the outer ring let dry. Do the inner color and then usually black is in the center. Let each color dry before you do the next. The last thing done to the eye is a tear drop spec of white on the upper side of the eye.
Your dorsal fins and tail fins usually have different colors, if you have not filled in those colors yet do that. Let dry. Then do the bone ribs on them. A good place to find out the aesthetics of the fish is the Pacific Sportfishing books with illustrations to show you what the fishes look like. The fish colors in the books vary as do the artists. When doing the rib bones in the fins pay attention to the bone colors, sometimes they are none existent, I use iridescent white mist for those bones. Other times the colors of the bone fade from dark to light. They get lighter as they go away from the head.
You now have a fish flying or coming out of the water. in either case, fish that do this have water splash that rises with the fish. This is the final step. It needs to be tied in with the water. Use iridescent white mist for the splashes. And you can use glittering blues and silver in independent dots and a tiny bit of seafoam green. Where the fish comes out of the water use a little white, if any. It is easy to ruin with too much white. Tying in the splash to your ocean with extending foam ripples using iridescent white mist. To see an example of what you are going to create go the slide show. You can click on the pictures of my flying bill fish. These pictures explain the tutorial in color detail.
You can add caught fish with a boat somewhere near the horizon, putting feathers in the fish's mouth and a fishing line using silver glitter. Now you can add seagulls or anything that would fit on your picture. If you have created a wave on the bottom with sand, you can put dry grass in the foreground like my Sunrise Silhouette with palm trees. The palm trees were painted first and the dry grass second. Some of my ideas come from three or four magazines. I see a fish I like in one, a boat in another, a sunset in yet another compiling and using three or four pictures to create one. Thus, making it an original. If you have any questions feel free to ask by blogging me.
Sunday, August 30, 2009
Saturday, August 22, 2009
Hooray Hooray
Hooray Hooray for today! I just sold another original of an ocean wave and got commissioned to do three original pieces of art. Does not seem much to some people, probably a drop in the bucket for others, but to me coming from my number one collector, it means a lot. He mentioned that he has more in store for me after I finish these three. Hooray! Hooray oh what a day.
Tuesday, August 11, 2009
When you're painting the random patterns of nature it is sometimes difficult0, r . Your brain says 123, 123, 123. It should be saying 436, 710, or 924. There are no two trees with the same branches. They are all random in every way imaginable. Keep this in mind when you paint, even all the are in fish books are similar. The same fish in different books are all different. There is no right or wring way to paint things of nature like waves, clouds, or rocks. There is only technique to learn how to create shadows, textures, or color mixing. A great way to learn this is to take a black and white photo class. The reason being is that it takes colors and turns them into shades of gray from solid white to solid black. You will be amazed by what a yellow filter does to the gray spectrum. Your brain will show you all the colors of the rainbow in you b/w photos. You will then see things differently when you paint in colors. We migh lose you to photography, but the instant fix of a photo is just that. I can't compete with that. I can sit all day photographing waves, and never find what I want but I can picture it in my head and paint it. Thus my giant blue heron came from a photo a friend gave me. The picture had in it a bicycle, rails, gas pumping dock, and a bait dock. None of which made it in the painting but the close up of the bird was perfect to use so I did. I have to tell you that I watched two ladies painting and discussing their experience. One of them went to a seminar to learn about her inadequate art. The artist told her that her colors were too vibrant and to paint softer. She was devastated and could not believe what she heard from him. Artist struggle with what other people want to buy. I call it whoring myself out to what I think will sell. I get a lot of people seeing my art every day. They all like different pieces for different reasons. It's as individual as the artisan who painted them. Be true to yourself, your art will be true to you.
Sunday, August 9, 2009
Lets paint
Depending on the sky you pick - morning daytime night time depicts what colors you will use. the time of day, brightness of day same with the ocean - depicts colors you will use. For instance, a sunset sky will be yellows purples blues maroon orange and red, your basic sunset colors. Next the ocean starting at the tape working your way down which is getting closer. Colors next to the tape will be deep dark blue like navy. Spreading lighter blues towards the bottom changing to dark greens turquoise, seafoam greens right where waves might end up. If you plan on putting in sand and waves crashing on the sand the last colors on the bottom of the painting will be adobe, shiny tea, snow cap white, and iridescent gold and shiny winter white. Layering these colors from the tape down using your spatula going side to side mixing all the colors together. Trying to prevent from making indentation with the card. Let dry. Do the sky with the same process mixing blues the lightest on the bottom of the sky and the darkest on the top of the sky. If you want wispy clouds, as you are mixing the sky drop in a couple of white or gray keep mixing from side to side. Voila! You now have a base. Completed step number one let dry. You have a horizon, a sky, and an ocean on which you can do most anything.
Helpful hints to get you started:
1. Wash fabric with no softener.
2. Stretch shirt on a board being able to rub fingers vigorously across the fabric without wrinkles.
3. Unwrap bottles and turn upside down in a cardboard box with holes in it.
4. Take 2" wide plastic tape across the shirt where you want the horizon.
5. Paint with big bottles use a card like a spatula to spread the paint across the shirt.
6. Let dry.
7. Put the tape on the sky. Paint the ocean side of the shirt.
8. Peel tape off immediately after painting ocean.
9. Stay tuned for the next blog. Any questions or difficulty, blog me.
Next fill in your subject matter base colors saving the details for last. Adding all you backgrounds and foregrounds basic colors before you create the final details. Stopping at each step for complete dry time. the only place to do fixing is at the basic colors step going back after the fill in is impossible. If you want to find out more, drop me a line and we will continue this class with anyone interested in painting with tulip paint. PS if you are a novice starting out go the thrift store to get t shirts inexpensive as well is the paint
Saturday, August 8, 2009
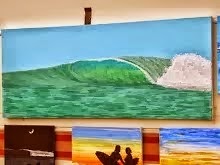
This newly painted original on Fredrix canvas is 66x18. This painting can be purchased directly from me. Call me at 714-785-6463. or email me at bubblepacific@yahoo.com
You know at times you think you are a failure as an artist because you don't sell anything. But art appreciated by an individual, liking what you do and the things you create is a beautiful thing. On a rare occasion you actually sell something like the eagle pulling a bass out of the water. it is 12 x 14 with about 12 - 13 hours worth of paint time. I would have requested $75, putting me at minimum wage. It puts me at about $2 an hour when I sold it for $30. Thus what some people consider to be a starving artist. It s supposed to be all about the art and not the money but unfortunately to make a living at it you have to sell something. Hearing the positive feedback I hear at Doheny State Park is a good thing. It inspires me to keep going, to not give up and to not quit. Down here they have art shows all the time. Yet, I don't have the money to show in the artshows- the business license, the resale license, the permits - whatever it takes. I don't have enough inventory yet to make a show. They say be prepared when opportunity knocks - thats what I can do.
Subscribe to:
Posts (Atom)